Running NUnit Tests Under TFS Build
UPDATE: There is a TFS2010 custom build activity as part of the Community TFS Build Extensions that will simplify this process – it only requires a single activity in the build workflow and does not require any external configuration. Unfortunately, the build extensions don’t seem to appear at all in a google search for “run nunit tests tfs 2010 build”. You can get them at http://tfsbuildextensions.codeplex.com/.
This post describes the steps required to get NUnit tests running under continuous integration wtih TFS Build, including publishing the results of the unit test run. A later post will describe getting QUnit tests to run under continuous integration with TFS Build using NQUnit.
This post is heavily based on the post at http://www.heikura.info/blog/publish-nunit-test-results-as-part-of-team-build-in-team-foundation-server-2010. Many thanks to the author and also to the creators of NUnit for Team Build, Richard Banks and Steve Godbold. The .NET community rocks!
There are some specifics about my setup such as the facts that I don’t use test metadata files and I am also not using test settings files, but the process should be realatively easy to modify to account for those scenarios once you get a feel for modifying build workflows.
Prerequisites
There are two pieces of software you’ll need to install on your build server. NUnit (duh!) and NUnit for Team Build. I’m using NUnit 2.5.10 from http://nunit.org/ (installed using the MSI package) and NUnit for Team Build 2.0 Alpha 1 from http://nunit4teambuild.codeplex.com/ (installed from a ZIP file – I put this in Program Files (x86)\NUnitTfs).
NUnit for Team Build must be configured for your environment. Open the NUnitTfs.exe.config file and set the endpoint addresses at the end to URLs appropriate for your environment. In most cases, you should just be able to change the server name to the build server name in your environment.
Modifying the Build Process
Here, we will modify the build process XAML file. Open the TFS source control explorer and navigate to the BuildProcessTemplates folder for your project. Open the build workflow editor by double clicking on the DefaultTemplate.xaml (assuming you haven’t changed the template being used).
The first thing you want to do is add some arguments that will tell our activities the location of the NUnit and NUnitTfs binaries. Click on the “Arguments” button at the bottom of the screen to expand the arguments editor. Add two arguments as follows:
| NUnitBinaryDirectory | "C:\Program Files (x86)\NUnit 2.5.10\bin\net-2.0" |
| NUnitTfsPublisherDirectory | "C:\Program Files (x86)\NUnitTfs" |
This assumes you used the MSI installer to install NUnit and you extracted the NUnit for Team Build package to the suggested location. Obviously, configure these to your requirements. Be sure to wrap the paths in double quotes.
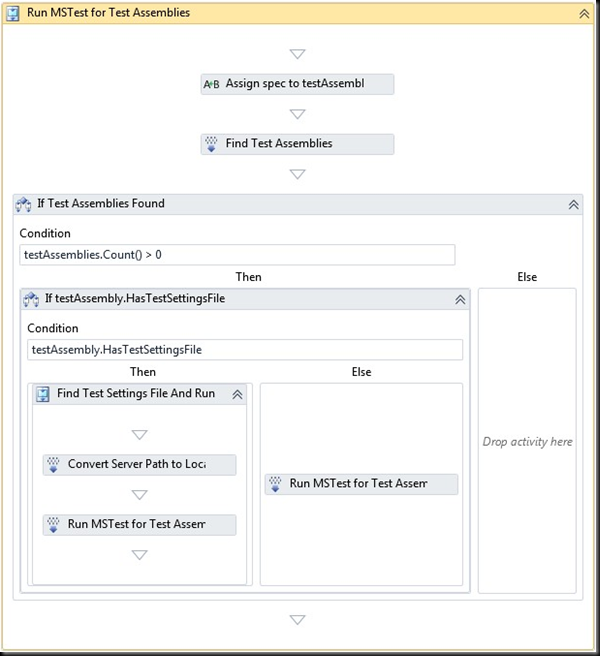
Next, find the “Run MSTest for Test Assemblies” activity under the “Compile and Test for Configuration” activity. It should look something like:
If you’re a little pedantic like me, click on the name “Run MSTest for Test Assemblies” to “Run NUnit for Test Assemblies”.
We need to add a variable to this activity to store the result of the test run. Right click the activity and click “Create Variable”. Name the variable NUnitResult, set its type to Int32 and ensure the scope is set to “Run NUnit for Test Assemblies”.
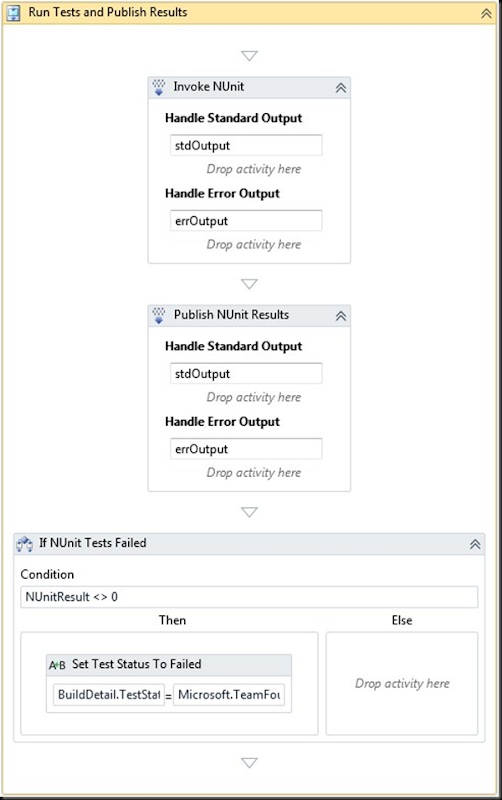
As mentioned, I’m not currently using test settings files and will assume that you aren’t either, so go ahead and delete the activity titled “If testAssembly.HasTestSettingsFile”. Open the toolbox, expand the “Control Flow” section and drag a “Sequence” activity under the “Then” part of the “If Test Assemblies Found”. Click the header where it says “Sequence” and rename it to “Run Tests and Publish Results”. We now need to add three activities to the sequence, an InvokeProcess activity for executing the NUnit tests, another InvokeProcess activity for publishing the results and a conditional to fail the build if unit tests fail.
Drag an “InvokeProcess” activity on to the sequence you created. Press F4 to open the properties window and set the properties as follows:
| Arguments | String.Format("/xml:nunit-tests.xml /framework:net-4.0 {0}", String.Join(" ", testAssemblies)) |
| DisplayName | Invoke NUnit |
| FileName | System.IO.Path.Combine(NUnitBinaryDirectory, "nunit-console.exe") |
| Result | [NUnitResult] |
| WorkingDirectory | outputDirectory |
You’ll notice we used the NUnitBinaryDirectory argument we created earlier in the FileName property to tell TFS Build where to find NUnit and we set the result to the NUnitResult variable we created.
The next step is to add an activity to publish the test results to the TFS Build web service using NUnit for Team Build. Drag another “InvokeProcess” activity on to the sequence, below the “Invoke NUnit” activity. Set the properties as follows:
| Arguments | String.Format("-n {0} -t {1} -p ""{2}"" -f {3} -b ""{4}"" -v 2010", |
| DisplayName | Publish NUnit Results |
| FileName | Path.Combine(NUnitTfsPublisherDirectory, "NUnitTfs.exe") |
| WorkingDirectory | outputDirectory |
Again, you’ll notice the use of the NUnitTfsPublisherDirectory argument to tell TFS Build where to find the NUnitTfs executable.
Now to create the activity to fail the build if tests fail. Drag an “If” activity (from the “Control Flow” section of the toolbox) below the “Publish NUnit Results” activity. Set the properties as follows:
| Condition | NUnitResult <> 0 |
| DisplayName | If NUnit Tests Failed |
Now, drag an “Assign” activity (from the “Primitives” section of the toolbox) on to the “Then” surface of the If activity. Set the properties as follows:
| DisplayName | Set Test Status To Failed |
| To | BuildDetail.TestStatus |
| Value | Microsoft.TeamFoundation.Build.Client.BuildPhaseStatus.Failed |
I was not able to get the build to be set to failed, only partially succeeded, I will post an update if I manage to get this working correctly.
Your build workflow should now look like this:
You should now be set to go! Save the file, check it in and trigger a build through the Build Explorer. If all goes to plan, your NUnit tests should show correctly in the test results section with the ability to open the results in the Visual Studio test results window!
Troubleshooting
TFS Build does not give much information if NUnit fails to execute successfully. To see exactly what is going on, open the build log (open Build Explorer, double click on the build, click the “View Log” link) and look for the activities we created, “Invoke NUnit” and “Publish NUnit Results”. The exact command line that was executed should appear in the log. Copy the command, remote to your build server, open a console window, paste the command in (you will probably need to wrap the path and file name in double quotes) and execute.
If this runs OK, you may need to execute the command as the build service account. Use runas to accomplish this.
Stay tuned for the next article on integrating QUnit tests with NQunit!
Labels: .NET, continuous integration, NUnit, TFS, unit testing

